Chocolate Meringue Easter Nests are not just a dessert they are little edible masterpieces that whisk you away to a world of sweetness and nostalgia. Imagine delicate clouds of chocolate meringue, cradling an array of colorful candies, with each bite bursting with flavors that sing in harmony like a joyful choir. The moment you take a whiff, the rich cocoa aroma dances through the air, teasing your senses and promising delightful indulgence.
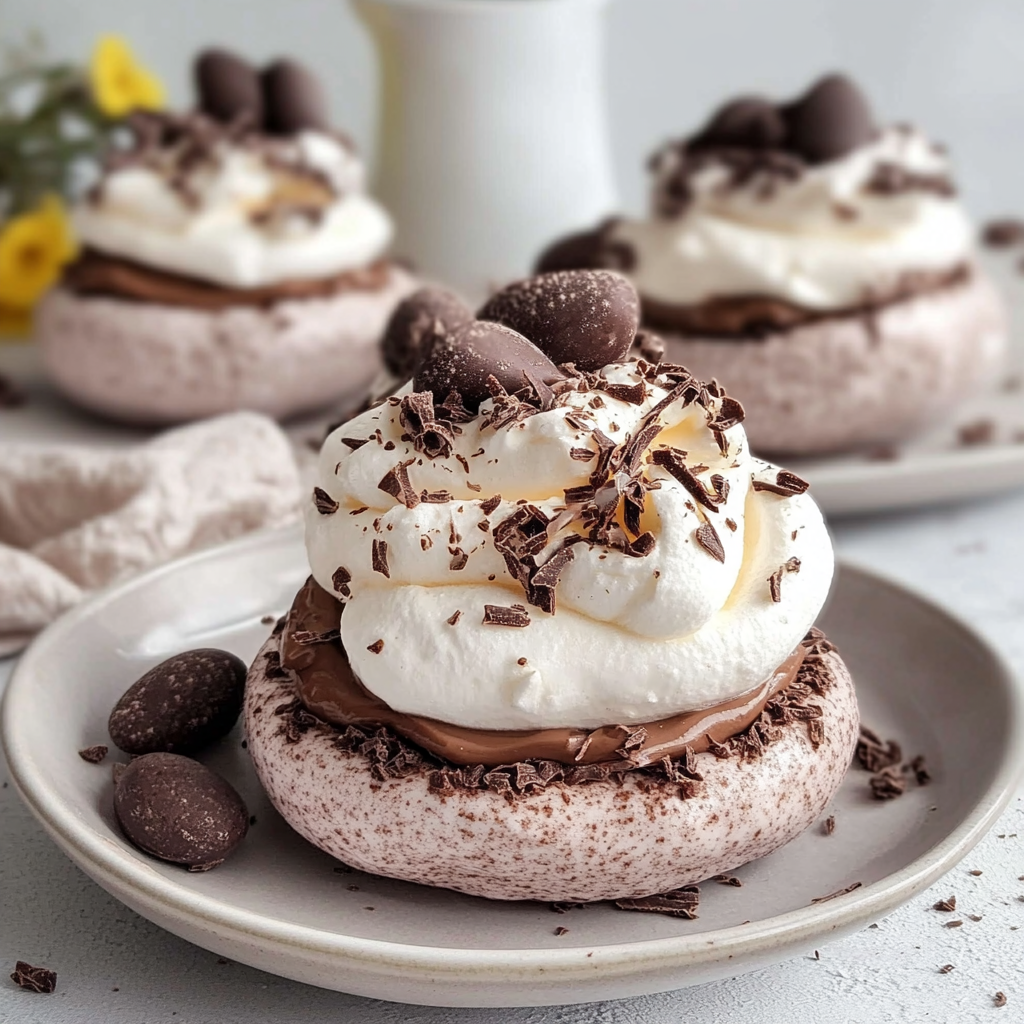
As a child, Easter was always a time for creativity and fun in the kitchen. I remember gathering with family, crafting these whimsical nests while giggling over melted chocolate and sticky fingers. It became our tradition to whip up these treats together, sharing stories and laughter as we decorated them with our favorite candies. The joy they brought was unmatched, turning our kitchen into a haven of happiness and sweet delight.
Why You'll Love This Recipe
- These Chocolate Meringue Easter Nests are incredibly easy to prepare, making them perfect for kids and adults alike
- The rich chocolate flavor contrasts beautifully with the crunchy meringue texture
- Their vibrant colors make them visually stunning for any festive occasion
- Versatile enough to customize with your favorite candies or sprinkles, they’re sure to impress
I still recall the wide-eyed delight on my niece’s face when she first tasted these nests pure magic

Essential Ingredients
Here’s what you’ll need to make this delicious dish:
- Egg Whites: Use fresh eggs for stable peaks room temperature works best for whipping.
- Granulated Sugar: Fine sugar dissolves better, creating that glossy meringue texture we all love.
- Cocoa Powder: Opt for high-quality cocoa powder for richer chocolate flavor Dutch-processed adds depth.
- Vanilla Extract: Pure vanilla extract enhances the sweetness avoid imitation for best results.
- Mini Chocolate Eggs or Candies: Choose colorful treats for decorating they add pops of fun and excitement.
The full ingredients list, including measurements, is provided in the recipe card directly below.
Let’s Make it Together
Preheat your oven to 225°F (110°C) and line a baking sheet with parchment paper. This will create a nonstick surface ideal for our meringue nests.
Whip the Egg Whites: In a clean mixing bowl, beat egg whites until foamy using an electric mixer on medium speed. Gradually increase speed until soft peaks form a process that takes about 3 minutes.
Add Sugar Gradually: Slowly sprinkle in granulated sugar while continuing to beat on high speed. Keep mixing until stiff peaks form and the mixture looks glossy this should take another 5 minutes.
Incorporate Cocoa and Vanilla: Gently fold in sifted cocoa powder and vanilla extract using a spatula. Be careful not to deflate the mixture we want those airy nests
Scoop onto Baking Sheet: Use a spoon or piping bag to create small nest shapes on the prepared baking sheet. Make sure to create an indentation in each mound for holding candies later.
Bake Low and Slow: Place the baking sheet in your preheated oven and let them bake for about 1 hour. The meringues should look dry but still be slightly soft inside don’t rush this step
Add Your Colorful Candy Toppings : Once cooled completely, carefully fill each nest with mini chocolate eggs or candies of your choice. Feel free to get creative this is where the fun truly begins
Enjoy your Chocolate Meringue Easter Nests while sharing stories around the table or gifting them to friends it’s all about spreading joy
You Must Know
- Chocolate Meringue Easter Nests are not just visually appealing they melt in your mouth with a delightful crunch
- This recipe is perfect for spring celebrations and can easily impress guests or brighten a family gathering
- The rich chocolate combines beautifully with the light meringue texture
Perfecting the Cooking Process
Begin by whipping egg whites until stiff peaks form, then gently fold in sugar and cocoa powder. Pipe the mixture into nest shapes on parchment paper, baking until crisp. Timing is crucial here: let them cool completely to maintain their structure and avoid collapsing.

Add Your Touch
Feel free to personalize your nests with different toppings like colorful candy eggs or edible flowers. You can also swap out dark chocolate for milk or white chocolate depending on your taste preference. Get creative and make these nests uniquely yours
Storing & Reheating
Store your Chocolate Meringue Easter Nests in an airtight container at room temperature for optimal freshness. Avoid refrigerating them, as moisture can ruin their crispiness. Enjoy them within a few days for the best texture and flavor.
Chef's Helpful Tips
- Ensure your mixing bowl is completely clean and dry before whipping egg whites even a drop of fat can prevent them from fluffing up properly
- Use room temperature egg whites for better volume, and don’t rush the folding process gently combine for the best results Create nests that are uniform in size to ensure even baking
I once made these nests for an Easter brunch, and my niece thought they were actual bird’s nests She was so excited when she found the candy eggs inside that I had to help her resist gobbling them all up at once.

FAQ
What makes Chocolate Meringue Easter Nests crispy?
The key is to bake them low and slow, allowing moisture to escape without burning.
Can I use liquid egg whites instead of fresh?
Yes, but ensure they’re high-quality pasteurized liquid egg whites for the best results.
How long do Chocolate Meringue Easter Nests last?
Stored properly, they remain fresh for about 3-5 days at room temperature.
Chocolate Meringue Easter Nests
5 Stars 4 Stars 3 Stars 2 Stars 1 Star
No reviews
- Author: Ann Foster
- Total Time: 1 hour 20 minutes
- Yield: Approximately 12 nests 1x
Description
Chocolate Meringue Easter Nests are delightful edible creations that bring joy and nostalgia to your festive celebrations. These airy chocolate meringues, adorned with colorful candies, create a perfect treat for both kids and adults. The combination of rich cocoa flavor and crunchy texture makes these nests a visually stunning centerpiece for any gathering, while their playful nature invites creativity in decorating.
Ingredients
- 4 large egg whites (room temperature)
- 1 cup granulated sugar
- 1/3 cup cocoa powder (sifted)
- 1 tsp vanilla extract
- Mini chocolate eggs or colorful candies for decoration
Instructions
- Preheat oven to 225°F (110°C) and line a baking sheet with parchment paper.
- In a clean bowl, beat egg whites on medium speed until foamy. Increase speed until soft peaks form (about 3 minutes).
- Gradually add sugar while beating on high speed until stiff peaks form and the mixture is glossy (about 5 minutes).
- Gently fold in sifted cocoa powder and vanilla extract.
- Scoop or pipe the mixture into small nest shapes on the prepared baking sheet, creating indentations for filling.
- Bake for about 1 hour until dry but slightly soft inside; let cool completely before decorating.
- Fill each nest with mini chocolate eggs or candies.
- Prep Time: 20 minutes
- Cook Time: 60 minutes
- Category: Dessert
- Method: Baking
- Cuisine: American
Nutrition
- Serving Size: 1 nest (30g)
- Calories: 110
- Sugar: 20g
- Sodium: 5mg
- Fat: 0g
- Saturated Fat: 0g
- Unsaturated Fat: 0g
- Trans Fat: 0g
- Carbohydrates: 28g
- Fiber: 1g
- Protein: 2g
- Cholesterol: 0mg

