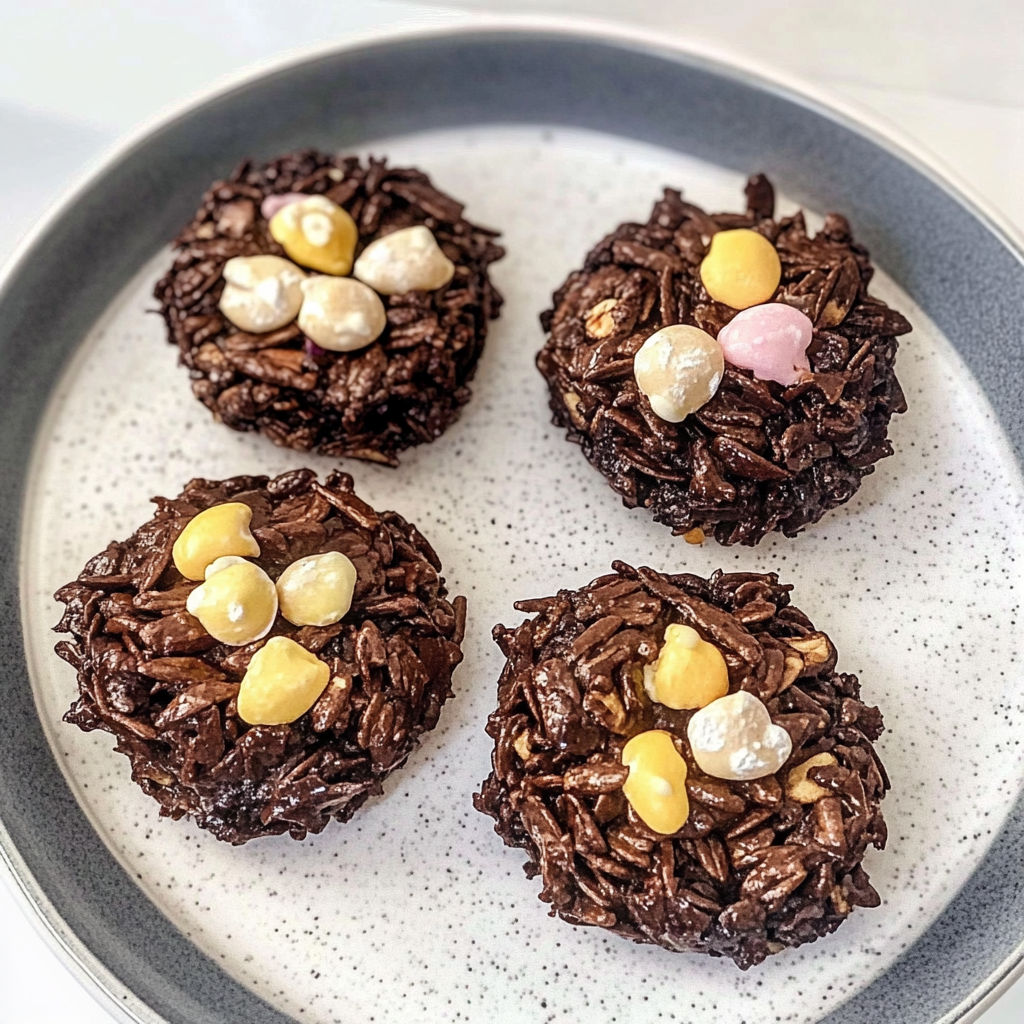
The sweet aroma of chocolate wafting through the kitchen can instantly uplift your mood. Imagine biting into a crispy yet chewy cookie, filled with delightful textures, and topped with a playful nest of chocolate and colorful candies. Chocolate Nest Cookies are not just a treat; they are an experience that dances on your taste buds.
These cookies are perfect for any occasion — family gatherings, birthday parties, or just because you need a little pick-me-up. The anticipation builds as you mix the ingredients, and the result is always worth the wait. Get ready to embark on a tasty adventure!
Why You'll Love This Recipe
- These Chocolate Nest Cookies are incredibly easy to whip up, making them perfect for last-minute cravings
- Their rich chocolate flavor paired with crunchy toppings creates an irresistible treat
- Visually appealing and fun to make, they are sure to impress friends and family
- Versatile enough for customization, you can swap in your favorite candies or nuts!
My friend once took a bite of these cookies and declared them “life-changing.” I still remind her of that day whenever I bring them to gatherings.
Essential Ingredients
Here’s what you’ll need to make this delicious dish:
All-Purpose Flour: This is your cookie base; make sure it’s fresh for the best texture.
Baking Powder: Essential for that delightful rise; check expiration dates for effectiveness.
Unsweetened Cocoa Powder: Choose high-quality cocoa for rich chocolate flavor.
Granulated Sugar: Sweetens the deal; adjust based on your sweetness preference.
Brown Sugar: Adds moisture and depth; light or dark works well here!
Butter: Use unsalted butter at room temperature for easy mixing.
Eggs: Two large eggs will bind everything together nicely.
Chocolate Chips: Semi-sweet chips add a melty goodness; feel free to mix in milk chocolate!
Coconut Flakes (optional): For added texture and tropical flair; use unsweetened if preferred.
Colorful Candies (for nests): Pick your favorites for decorating; think Easter eggs or M&M’s!
The full ingredients list, including measurements, is provided in the recipe card directly below.

How to Make Chocolate Nest Cookies
Preheat Your Oven: Begin by preheating your oven to 350°F (175°C). This step ensures even baking while you prepare the dough.
Mix Dry Ingredients: In a large bowl, whisk together flour, cocoa powder, baking powder, and salt until well combined. This helps evenly distribute the leavening agents.
Cream Butter and Sugars: In another bowl, beat softened butter with granulated sugar and brown sugar until light and fluffy. The mixture should look pale and creamy.
Add Eggs: Beat in the eggs one at a time until fully incorporated. Your batter will become smooth and glossy – a sign you’re on the right track!
Combine Wet and Dry Ingredients: Gradually fold the dry mixture into the wet ingredients using a spatula. Avoid overmixing; we want those cookies fluffy!
Add Chocolate Chips: Stir in chocolate chips (and coconut flakes if using) until evenly distributed throughout the dough. You want pockets of gooey chocolate in every bite.
Scoop and Shape Cookies: Using a spoon or cookie scoop, drop rounded tablespoons of dough onto lined baking sheets. Leave space between each cookie as they will spread.
Bake: Place in the preheated oven and bake for about 10-12 minutes until edges are set but centers remain soft. They’ll firm up as they cool!
Create Nests: Once cooled slightly, use your fingers to create small indentations in each cookie’s center. Fill these nests with melted chocolate or colored candies for decoration.
Enjoy these delightful creations fresh out of the oven or stored in an airtight container — if they last long enough!
You Must Know
- Chocolate Nest Cookies are a delightful treat that combines crispy texture with rich chocolate flavor
- These cookies are perfect for any occasion, and their whimsical nest shape makes them a hit with kids and adults alike
- The aroma of baking chocolate wafting through your kitchen is simply irresistible
Perfecting the Cooking Process
Start by preheating your oven to 350°F while you prepare the dough. This ensures even baking and a deliciously gooey center.
Add Your Touch
Feel free to swap semi-sweet chocolate chips for dark or white chocolate for different flavors. Add nuts, dried fruits, or sprinkles for extra fun!
Storing & Reheating
Store your Chocolate Nest Cookies in an airtight container at room temperature for up to a week. To reheat, pop them in the microwave for 10-15 seconds for that fresh-baked feel.
Chef's Helpful Tips
- To achieve the best texture, chill your cookie dough for at least 30 minutes before baking
- Avoid overmixing the dough to keep the cookies tender and light
- Experiment with different toppings like coconut flakes or mini marshmallows for added flair!
Sharing my first batch of these Chocolate Nest Cookies was a memorable moment; my friends devoured them so fast I barely got one!
FAQ
What makes Chocolate Nest Cookies different from regular cookies?
Chocolate Nest Cookies have a unique shape resembling nests, filled with delightful chocolate treats.
Can I use gluten-free flour in this recipe?
Yes, gluten-free flour can work well; just ensure it’s a suitable blend for cookies.
How long do Chocolate Nest Cookies last after baking?
They typically stay fresh for about a week when stored properly in an airtight container.

Chocolate Nest Cookies
- Total Time: 27 minutes
- Yield: Approximately 24 cookies 1x
Description
Chocolate Nest Cookies bring a delightful twist to your traditional cookie experience. These treats combine a crispy exterior with a chewy center, topped with a playful nest of melted chocolate and colorful candies. Perfect for any occasion, from family gatherings to solo snacking, these cookies are not only fun to make but also sure to impress. With their rich chocolate flavor and customizable toppings, you’ll fall in love with every bite!
Ingredients
- 1 cup all-purpose flour
- 1 tsp baking powder
- 1/3 cup unsweetened cocoa powder
- 1/2 cup granulated sugar
- 1/2 cup brown sugar
- 1/2 cup unsalted butter, softened
- 2 large eggs
- 1 cup semi-sweet chocolate chips
- 1/2 cup coconut flakes (optional)
- Colorful candies for decoration
Instructions
- Preheat oven to 350°F (175°C).
- In a bowl, whisk together flour, cocoa powder, baking powder, and salt.
- In another bowl, cream the butter and sugars until fluffy. Add eggs one at a time.
- Gradually mix dry ingredients into wet ingredients until combined.
- Stir in chocolate chips and coconut flakes if using.
- Scoop rounded tablespoons onto lined baking sheets, leaving space between each cookie.
- Bake for 10-12 minutes until edges are set but centers remain soft.
- Create small indentations in the center of each cookie and fill with melted chocolate or candies.
- Prep Time: 15 minutes
- Cook Time: 12 minutes
- Category: Dessert
- Method: Baking
- Cuisine: American
Nutrition
- Serving Size: 1 serving
- Calories: 150
- Sugar: 10g
- Sodium: 90mg
- Fat: 7g
- Saturated Fat: 4g
- Unsaturated Fat: 3g
- Trans Fat: 0g
- Carbohydrates: 21g
- Fiber: 1g
- Protein: 2g
- Cholesterol: 20mg