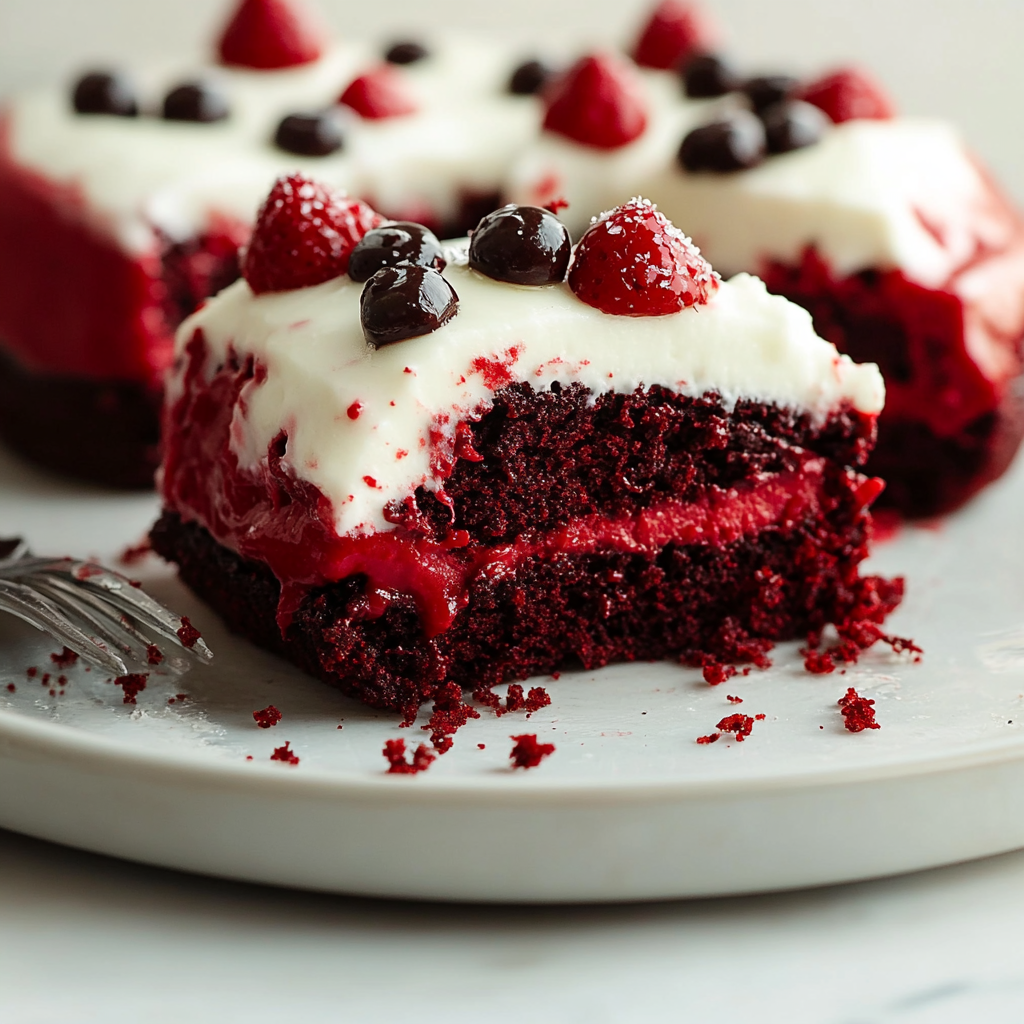
There’s something magical about the moment you slice into a red velvet poke cake. Imagine the soft, velvety texture, the sweet aroma wafting through your kitchen, and that enticing crimson hue beckoning you to take a bite. It’s like a dessert hug that whispers, “You deserve this.” Whether it’s celebrating birthdays, anniversaries, or just because it’s Tuesday, this cake is always a hit.

I remember the first time I made red velvet poke cake for my family. The excitement in the room was palpable as I unveiled this masterpiece. My little niece’s eyes grew wide with wonder. With each forkful, everyone sat in blissful silence—until my brother exclaimed, “This is better than my last Tinder date!” And so began our love affair with this delightfully decadent dessert.
Why You'll Love This Recipe
- This red velvet poke cake is incredibly simple to make and delivers a burst of flavor in every bite
- Its striking color makes it a showstopper at any gathering
- You can easily customize toppings to suit your taste or occasion
- Perfect for celebrations but also a delightful treat for any day of the week!
The memories we’ve created around this cake are unforgettable; it has become our go-to recipe for gatherings, sparking laughter and joy every time.
Essential Ingredients
Here’s what you’ll need to make this delicious dish:
Red Velvet Cake Mix: A classic choice that simplifies preparation while delivering rich flavor and moisture.
Eggs: Use large eggs for optimal binding and fluffiness; they help elevate your cake.
Vegetable Oil: This keeps the cake moist and tender; I recommend using canola or sunflower oil.
Buttermilk: For that signature tangy flavor and tender crumb; homemade buttermilk works wonders if you’re out.
Chocolate Pudding Mix: Adds an extra layer of richness; opt for instant pudding for quicker results.
Heavy Whipping Cream: Essential for creating that luscious topping; whip until peaks form but don’t overdo it!
Powdered Sugar: To sweeten your whipped cream without making it grainy; sift it before mixing in.
Cream Cheese: The star ingredient for frosting—choose full-fat for maximum creaminess and flavor.
Vanilla Extract: A splash enhances all flavors beautifully; use pure extract whenever possible.
The full ingredients list, including measurements, is provided in the recipe card directly below.
How to Make red velvet poke cake
Prepare Your Oven and Pan: Preheat your oven to 350°F (175°C). Grease a 9×13 inch baking dish with nonstick spray to ensure an easy release after baking.
Mix Your Cake Batter: In a large bowl, combine the red velvet cake mix, eggs, vegetable oil, and buttermilk. Stir until smooth and fluffy—just like your mood when dessert is on its way!
Bake the Cake: Pour the batter into your prepared baking dish and smooth out the top. Bake for 30-35 minutes until a toothpick comes out clean—resist the urge to eat it straight from the pan!
Poke Holes in the Cake: Once baked, let your cake cool slightly. Then use the end of a wooden spoon to poke holes all over. This allows all that delicious filling to seep in like love notes.
Create the Filling: In a separate bowl, whisk together chocolate pudding mix with milk according to package instructions until thickened. Pour this over your poked cake, letting it fill those holes like cozy blankets on a chilly night.
Top It Off!: Whip heavy cream until soft peaks form, then mix in powdered sugar and vanilla extract. Spread this heavenly topping over your cooled cake along with dollops of cream cheese frosting—it’s basically dessert perfection!
Now sit back and watch as everyone dives into your masterpiece—just be ready for requests for seconds!
Enjoy sharing this delightful red velvet poke cake with family and friends while creating new memories filled with laughter and sweetness!
You Must Know
- This delightful red velvet poke cake is a showstopper at any gathering
- The vibrant color and rich flavor will impress your guests, while the poke technique makes it irresistibly moist
- A perfect balance of cream cheese frosting and cake creates an unforgettable dessert experience
Perfecting the Cooking Process
To achieve the ultimate red velvet poke cake, bake the cake first, then prepare the frosting while it cools. Once cooled, poke holes and soak with sweetened condensed milk for added moisture.
Add Your Touch
Feel free to switch up flavors by using chocolate pudding instead of vanilla or adding berries on top. You can also sprinkle crushed nuts for extra crunch if you’re feeling adventurous!
Storing & Reheating
Store leftover red velvet poke cake in an airtight container in the fridge for up to five days. If you need to reheat, do so gently in the microwave for about 10-15 seconds.
Chef's Helpful Tips
- For a perfect texture, ensure your ingredients are at room temperature before mixing
- Always check your cake with a toothpick—if it comes out clean, it’s done!
- Don’t skip the soaking step; it’s vital for that moistness we crave!
I remember baking this red velvet poke cake for my best friend’s birthday last year. When she took her first bite, her eyes lit up like Christmas morning!
FAQ
What makes red velvet poke cake different?
Red velvet poke cake is unique due to its moistness from soaking and vibrant color.
Can I use a different frosting?
Absolutely! Cream cheese or whipped topping works wonderfully as alternatives.
How long does the cake last in the fridge?
The red velvet poke cake can stay fresh in the fridge for up to five days.

Red Velvet Poke Cake
- Total Time: 55 minutes
- Yield: Serves about 12 1x
Description
Indulge in the decadent delight of red velvet poke cake, a show-stopping dessert that captivates with its rich flavor and vibrant color. This easy-to-make cake features layers of moist red velvet soaked in chocolate pudding, topped with a luscious cream cheese frosting. Perfect for birthdays, anniversaries, or simply treating yourself, this cake is sure to become a favorite at any gathering.
Ingredients
- 1 box red velvet cake mix (15.25 oz)
- 3 large eggs
- 1/2 cup vegetable oil
- 1 cup buttermilk
- 1 box instant chocolate pudding mix (3.9 oz)
- 2 cups milk (for pudding)
- 1 cup heavy whipping cream
- 1/2 cup powdered sugar
- 8 oz cream cheese (softened)
- 1 tsp vanilla extract
Instructions
- Preheat your oven to 350°F (175°C) and grease a 9×13 inch baking dish.
- In a large bowl, combine the red velvet cake mix, eggs, vegetable oil, and buttermilk; mix until smooth.
- Pour the batter into the prepared dish and bake for 30-35 minutes or until a toothpick comes out clean.
- Once baked, allow the cake to cool slightly and poke holes all over using a wooden spoon handle.
- In a separate bowl, whisk together chocolate pudding mix with milk until thickened, then pour over the poked cake.
- Whip heavy cream until soft peaks form; add powdered sugar and vanilla extract. Spread over the cooled cake along with dollops of cream cheese frosting.
- Prep Time: 20 minutes
- Cook Time: 35 minutes
- Category: Dessert
- Method: Baking
- Cuisine: American
Nutrition
- Serving Size: 1 slice (120g)
- Calories: 360
- Sugar: 28g
- Sodium: 320mg
- Fat: 22g
- Saturated Fat: 10g
- Unsaturated Fat: 10g
- Trans Fat: 0g
- Carbohydrates: 36g
- Fiber: 1g
- Protein: 5g
- Cholesterol: 70mg